For field sales professionals, time on the road is just as important as time spent with customers. When your job involves visiting the same clients or territories on a regular basis, optimizing your sales route isn't just a convenience—it's a key part of working smarter. That’s where repetitive sales route optimization comes in.
Repetitive/Recurring sales route optimization is all about planning your recurring sales visits in the most efficient way possible. Instead of sticking to the same routine or relying on guesswork, optimized routes help you reduce unnecessary travel, avoid backtracking, and make the most of your day. Whether you're handling a weekly route, bi-weekly calls, or monthly check-ins, smarter routing means more time with customers, less time in traffic, and fewer miles on the road.
With modern tools and technologies, it's now possible to automatically create and adjust your routes based on customer priorities, visit frequency. This means you can focus more on building relationships and closing deals—while the system takes care of the planning.
In the end, route optimization helps you work more efficiently, hit your targets faster, and deliver better service—without burning yourself out.
How It Works
Input data like customer locations, visit frequency (e.g. every Monday, every two weeks), time windows.
Our Optimization algorithms analyze the best way to group and schedule visits over time.
The system creates recurring routes that are more efficient and balanced.
Routes can be adjusted dynamically as things change—like a customer rescheduling or a new lead being added.
This blog post explains how to make Repetitive Sales Route Optimization for Field Sales Teams with Routin Team.
If you're not a member yet, click here for a free 14-day trial
The process is completed in eight steps.
1.Click Recurring Plans on the left side menu.
![]()
2.On Recurring Plans screen click Add New Recurring Plan.
![]()
Type the name of the plan. Select start and end dates of the recurring plan. It determines the time interval during which these routes will be automatically created by the system and sent to your field personnel. Select route starting hour (Start Time). Select the depot (or headquarter) where the routes will start or end. If you want to assign visit frequencies (weekly, bi-weekly, monthly) for some stops, get the Stop Frequency field selected.
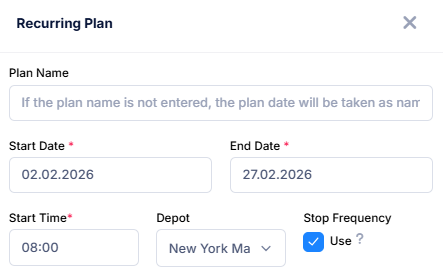
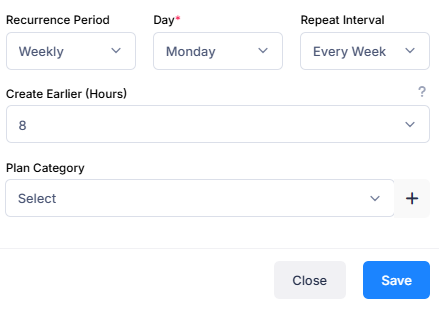
Let us create a monthly plan as an example. Select an end date of one month after the start date. Select "Weekly" as Recurrence Period. Which means that plan will be optimized weekly but will be repeated for one month. When generating routes repeatedly, stop frequencies (weekly, biweekly, monthly) will be taken into account. Select "Monday" as the day field. By this way, weekly routes will be generated and sent to drivers on Mondays each week.
In recurring planning, routes are not sent to the drivers manually. System will send the routes to the related drivers automatically. All you need to do is selecting the how many hours earlier the routes should be sent. Select the Create Earlier option for this purpose.
Then click Save.
3.The Plan Screen displays three sections. Drivers are displayed on the left, stops are displayed in the middle, and the map is displayed on the right. The depot location is marked on the map.
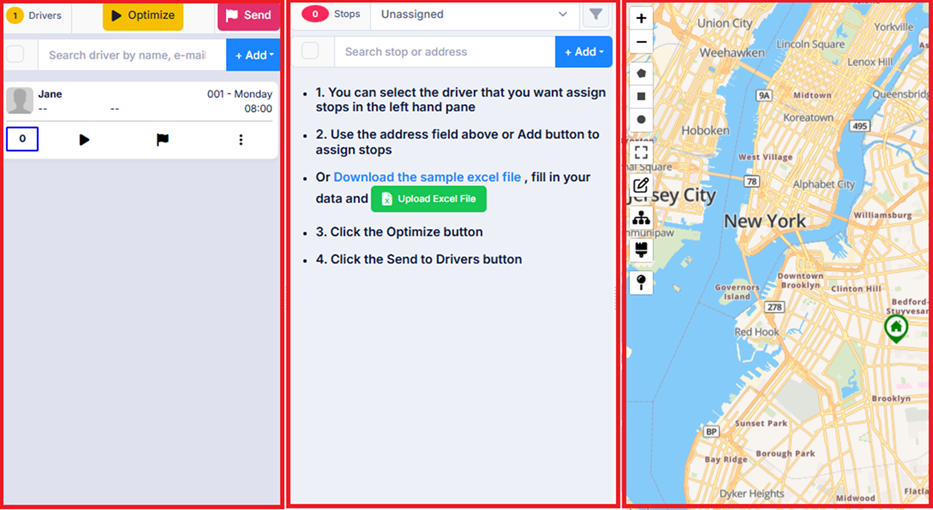
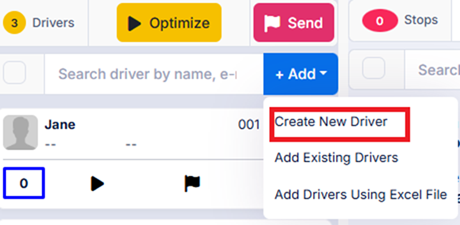
4.Drivers defined for the depot will be automatically added to the plan. To create a new driver, click Add button above the Drivers section, then click the Create New Driver button and define the driver. (For more information, see the blog post "How to create a driver?".)
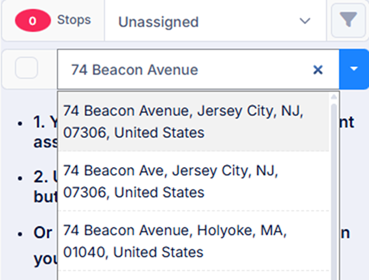
5.Add stops for drivers to visit. There are several ways to do this. You can add addresses one by one by entering the address (house number and street/avenue name) in the Address Search field above the Stops section and selecting the address from the options provided.
You may write the name of the customer or name of the building in Stop Name field. You may enter the customer's mobile phone number in the Phone field. This information will appear in the mobile app as the driver follows the route. This will allow the driver to call the customer if necessary.
Enter Opening Hour (Opening Time) and/or Closing Hour (Closing Time) if you are confined to visit the stop within these hours. The routing algorithm will plan the routes considering these hours, if you enable Time Windows Constrained optimization in step 6.
You may add notes to the Notes to Driver field. If entered this data will be displayed in the driver mobile app, next to name of the stop. If you want to store this stop data for future use, get the Add to Address Book field selected.
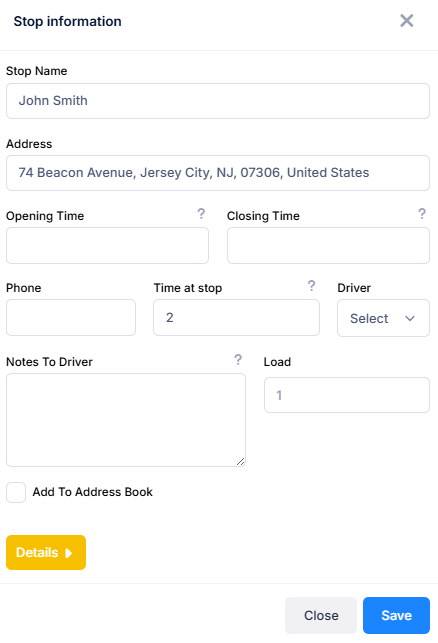
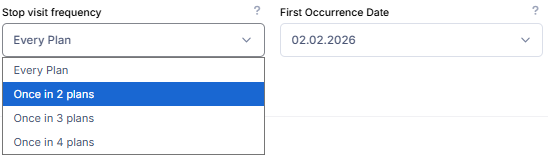
To add, stop visit frequency data, click Details. In our example scenario, we want to create a weekly route plan and repeat it for a month. Stop visit frequency data should be entered on the "Stop Information" screen. For example, for a stop that you want to visit every two weeks, you should select the "once in 2 plans" option. Since the plans are weekly, this means every two weeks. Similarly, for a stop that you want to visit once a month, you should select the "once in 4 plans" option. The system will automatically add stops to the routes according to the selected frequency. For example, if you select "once in two plans," the stop will be added to the route one week and will be omitted the following week. The "First Occurrence Date" field allows you to specify the week in which the first visit will occur.
To upload multiple stops at once, Check blog post How to Upload Multiple Stops Using Excel File?
6.Click Optimize button in Planning Screen.
![]()
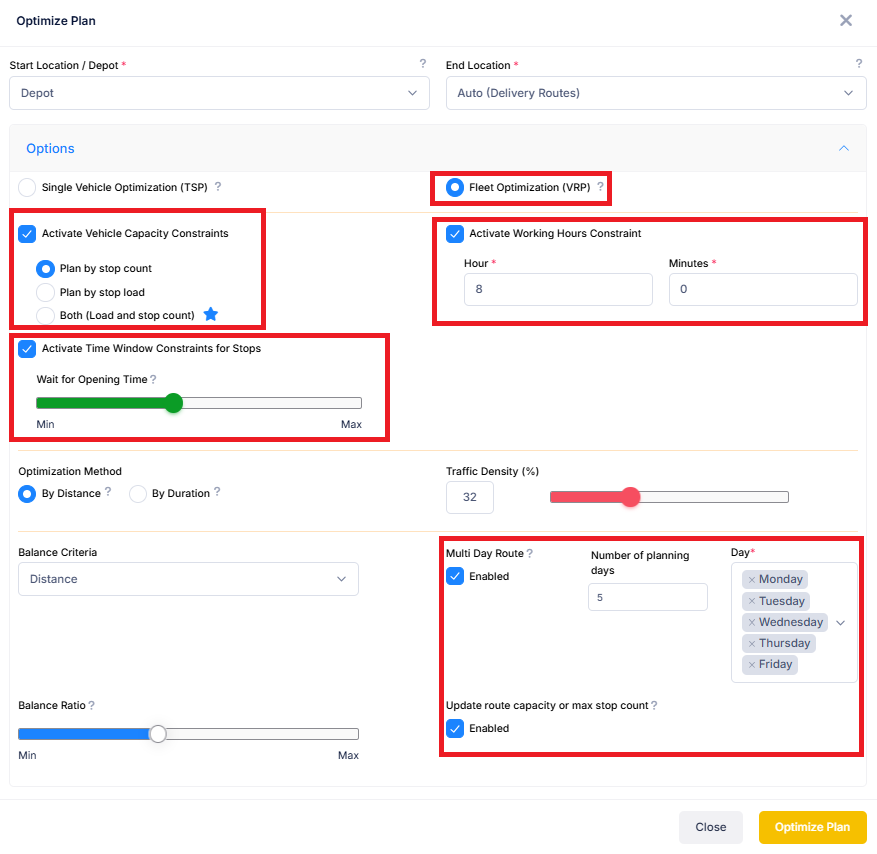
Select Start and End locations. Click Options button and select Fleet Optimization.
Get the “Activate Working Hours Constraints” option enabled to define working hours limit.
If you want the system to take into account the opening/closing time restrictions at stops, enable the “Activate Time Window Constraints for Stops” option. (Don’t forget to define opening and/or closing time for the stops, as shown in step 5)
In our example scenario, we want to create a weekly route plan.To do this, let's enable the multi-day route option that appears at the bottom right.Let's set the number of days to 5 and select weekdays. This will create a separate route for each driver on each weekday. If you want to roughly equalize the number of visits across all routes, enable the "Update route capacity or max stop count" option.
Get the “Activate Vehicle Capacity Constraints” option enabled to be able distribute stops evenly between drivers and days.
Then click Optimize Plan button to get the result.
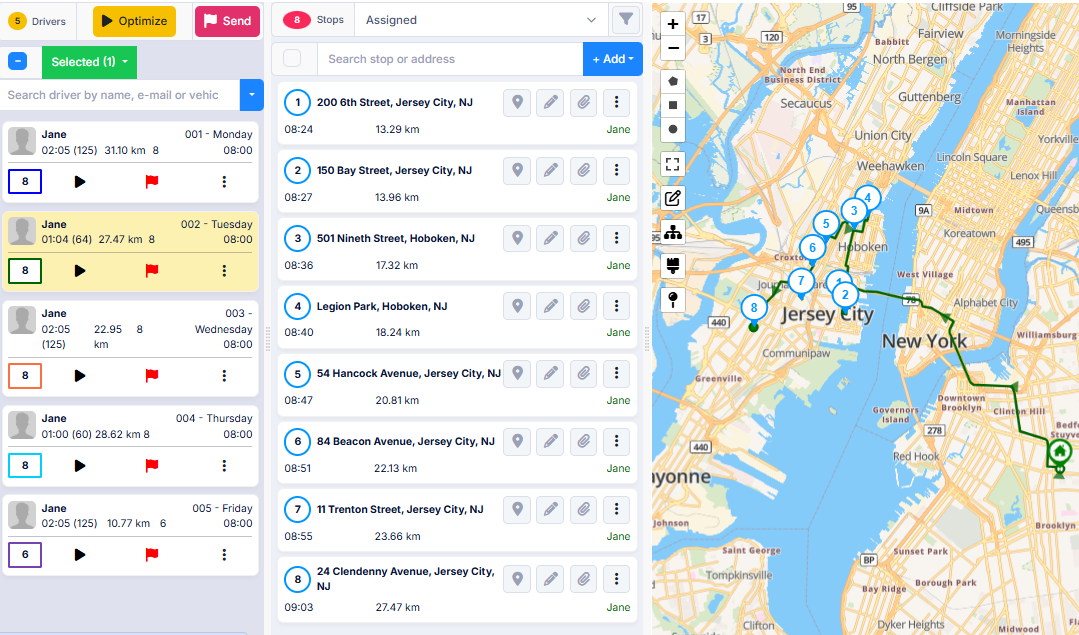
7.Result will be displayed on map and on stops section. As you can see, a weekly route plan has been created for the driver, and the stops have been distributed across the selected days. For example, when you click on Tuesday's route, you'll see the stops in center section and the route line on the map.
You can repeat the same process with multiple drivers if you wish. Resulting routes will be sent to the drivers automatically in recurrence period (every Monday in our example).
8.Click the "Recurring Plans" button to track the progress of the routes and make daily changes dynamically if desired.
![]()
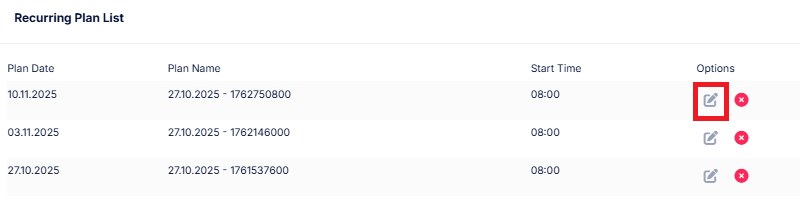
Then, click the "Recurring Plan List" button in the row of the recurring plan you've created.
![]()
The list that opens shows the automatically generated plans. To view and make changes to the plan for the desired date, click the "Edit Details" button to the right. You can edit the plan and resend the routes to the drivers.
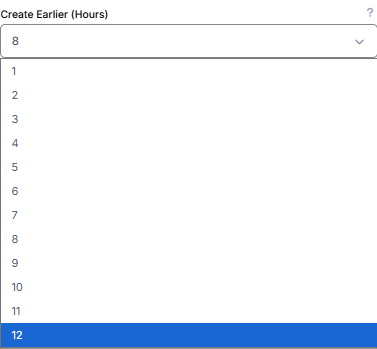
Don't worry if no plans appear on this screen. The plans are generated a few hours in advance of the route date. If you want routes to be generated earlier, go back to the Recurring Routes screen and click the Menu button to the right of your Master plan. Then click on the Plan Info button.
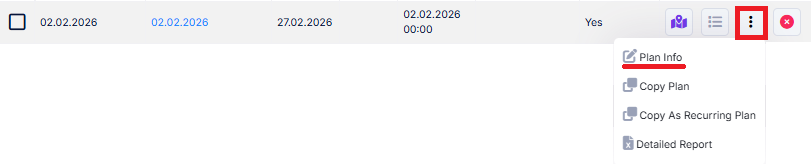
On the screen that opens, change “Create Earlier (Hours)” option to 12 and click “Save”. Thus, your plan will be created 12 hours in advance.